반응형

연산자

Dart는 C나 JAVA에서 사용하는 기본적인 연산자를 거의(?) 그대로 사용이 가능하다.

구분 연산자
할당 연산자 =, +=, -=, *=, /=, %=
??=   대상이 null인 경우만 우변의 값을 넣어줌
~/=, <<=, >>=, &=, |=, ^=    잘 안쓰는 거...
산술연산자 +, -, *, /, %, ++, --,
~/  나누기, 정수 결과 반환
관계연산자 ==, !=, >, <, >=, <=
논리연산자 ! true/false 를 반대로
||, &&
삼항 연산자 ?      condition ? expr1 : expr2.  , 조건이 참이면 1, 아니면 2
??     expr1 ?? expr2  , 1이 null 이 아니면 1값, null 이며 2값
타입 테스트 연산자 as    강제형변환
is     특정 타입인 경우 true
ls!    특정 타입이면 false


final, const, static

► final : 변수를 참조하는 값이 한번 설정되면 다른 값으로 변경될 수 없음.

► const : 상수

► static : 흠,.. 인스턴스를 만들지 않고 언제든 실행할 수 있는  키워드. 이게 붙지 않으면 클래스로 인스턴스를 만들어서 참조해야함.


반응형
반응형

Dart에서는 일반적인 반복, 제어문을 사용한다.

홈페이지서 설명하는 내용과 내가 이해하기 쉬운 코드로 다시 작성해보도록 하겠다.


  •  if and else
  • for loops
  • while and do-while loops
  • break and continue
  • switch and case
  • assert
  • (추가) try-catch and throw


if and else

Dart에서 지원되는 ifelse 샘플이다.

if (isRaining()) {
	you.bringRainCoat();
} else if (isSnowing()) {
	you.wearJacket();
} else {
	car.putTopDown();
}

▸ Javascript 와는 달리 boolean 값을 사용하며, 다른 값은 사용해서는 안됨.


for loops

반복문 샘플 - for

var callbacks = ['a', 'b', 'c', 'd', 'e'];
for (var i = 0; i < callbacks.length; i++) {
	print("for - ${callbacks[i]}");
}

반복문 샘플 - for + forEach()

var callbacks = ['a', 'b', 'c', 'd', 'e'];
callbacks.forEach((element) { print("forEach - $element"); });

반복문 샘플 - for-in

var callbacks = ['a', 'b', 'c', 'd', 'e'];
for( var x in callbacks){
	print("for-in - $x");
}


while and do-while loops

조건을 평가하고 루프를 진행 - while

while (!isDone()) {
	doSomething();
}

루프를 실행한 후 평가 - do-while

do {
	printLine();
} while (!atEndOfPage());


break and continue

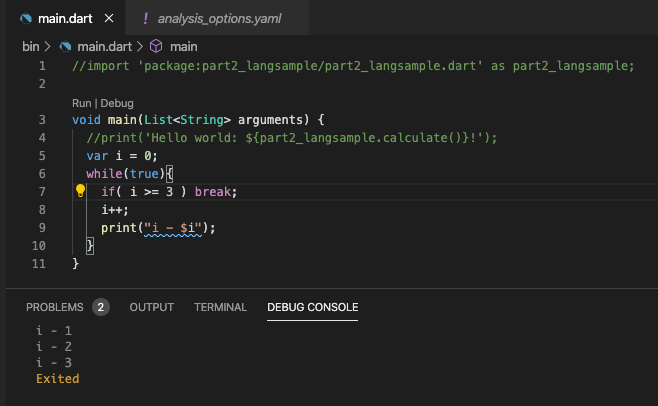
while 문으로 반복 실행 중 특정 조건이 맞다면 while을 종료 - break

var i = 0;
while(true){
	if( i >= 3 ) break;
	i++;
	print("i - $i");
}

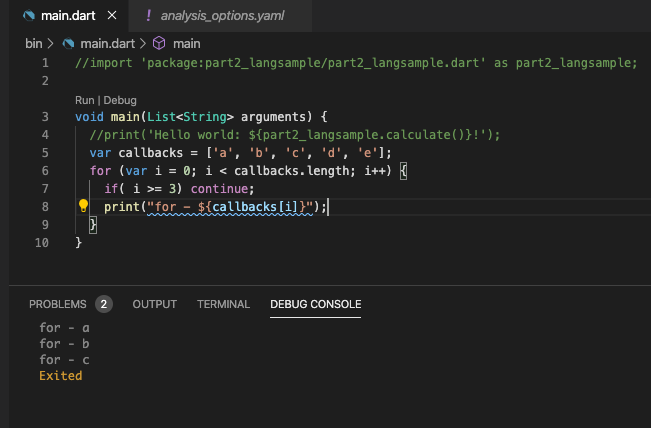
for 루프 반복문 종료 - continue

var callbacks = ['a', 'b', 'c', 'd', 'e'];
for (var i = 0; i < callbacks.length; i++) {
      if( i >= 3) continue;
      print("for - ${callbacks[i]}");
}


switch and case

Dart의 switch 문은 정수, 문자열 또는 컴파일러 시간 상수(?, compile-time constants)를 비교함. 비교된 개체는 모두 동일한 클래스의 인스턴스여야 하며, 클래스가 재정의 되어서는 안됨.

 ▸ 같은 타입으로 비교하는 소리 같은데...


 그리고 case 에서 break 를 사용하는 것을 원칙으로 한다. 

var command = 'OPEN';
switch (command) {
  case 'CLOSED':
    executeClosed();
    break;
  case 'PENDING':
    executePending();
    break;
  case 'APPROVED':
    executeApproved();
    break;
  case 'DENIED':
    executeDenied();
    break;
  case 'OPEN':
    executeOpen();
    break;
  default:
    executeUnknown();
}

다음 예제는 오류가 발생되는 예. case 안에 수행하는 내용이 존재하면 오류가 발생됨.

var command = 'OPEN';
switch (command) {
  case 'OPEN':
    executeOpen();
    // ERROR: Missing break

  case 'CLOSED':
    executeClosed();
    break;
}

하지만 비어 있는 경우는 사용할 수 있다.

var command = 'CLOSED';
switch (command) {
  case 'CLOSED': // Empty case falls through.
  case 'NOW_CLOSED':
    // Runs for both CLOSED and NOW_CLOSED.
    executeNowClosed();
    break;
}

또는 continue 문을 사용하여 진행할 수 있음.

▸ 테스트 해보지 않았으나, executeClosed()를 실행한 후에 nowClosed가 명시된 case 'NOW_CLOSED'를 수행하는 것으로 보임. 

var command = 'CLOSED';
switch (command) {
  case 'CLOSED':
    executeClosed();
    continue nowClosed;
  // Continues executing at the nowClosed label.

  nowClosed:
  case 'NOW_CLOSED':
    // Runs for both CLOSED and NOW_CLOSED.
    executeNowClosed();
    break;
}


assert

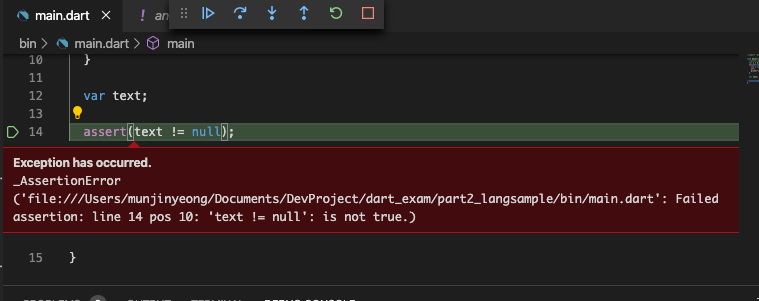
 개발 환경에서 assert 문구를 사용함. assert( condition, optionalMessage); 

참/거짓 조건에서 거짓인 경우 해당 부분에서 중단됨.

var text;

assert(text != null);


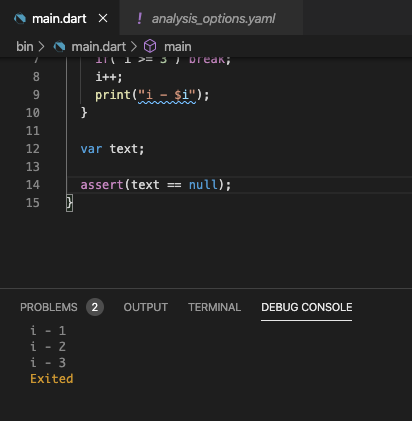
true 인 경우 그대로 진행됨

var text;

assert(text == null);


try-catch and throw

예외처리에 관한 내용. 

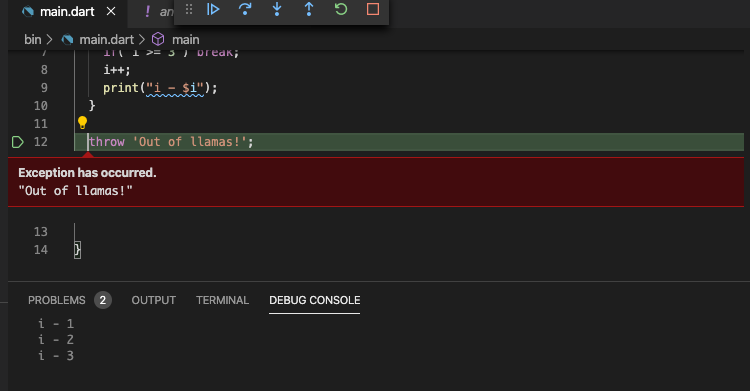
throw 를 이용하여 예외상황을 만들 수 있음.

throw 'Out of llamas!';


try-catch 를 이용하여 예외가 발생된 코드를 처리하기 위해 사용. 이것도 다른 언어들과 거의 동일.

try {
  breedMoreLlamas();
} on OutOfLlamasException {
  // A specific exception
  buyMoreLlamas();
} on Exception catch (e) {
  // Anything else that is an exception
  print('Unknown exception: $e');
} catch (e, s) {
  // No specified type, handles all
  print('Something really unknown: $e');
}

catch 상황에서 매개 변수를 넣을 수 있는데 수에 따라 다음과 같이 처리 됨.

매개변수 0. 아무것도 없음

매개변수 1. Exception 상세 내용

매개변수 2. StackTrace 객체 


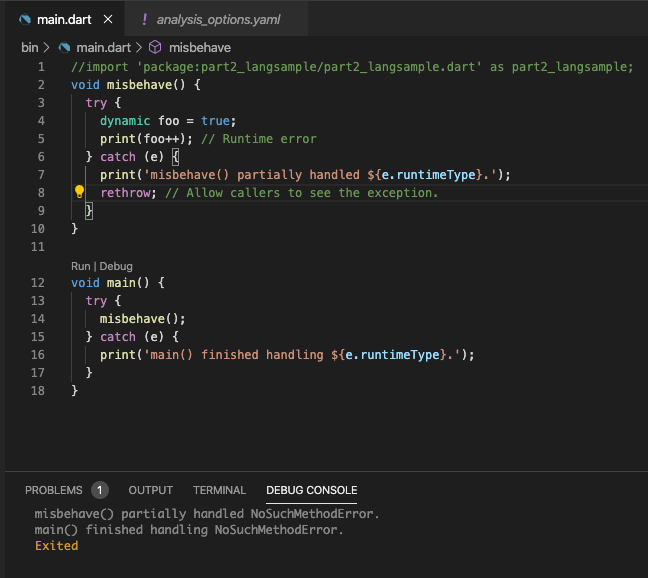
rethrow를 사용하면 exception 상황을 처리하고 중지되지 않고 진행되도록 한다.

void misbehave() {
  try {
    dynamic foo = true;
    print(foo++); // Runtime error
  } catch (e) {
    print('misbehave() partially handled ${e.runtimeType}.');
    rethrow; // Allow callers to see the exception.
  }
}

void main() {
  try {
    misbehave();
  } catch (e) {
    print('main() finished handling ${e.runtimeType}.');
  }
}


rethrow를 넣고 실행하면 main()의 catch까지 실행되며

아래와 같이 rethrow 를 주석처리 해서 실행하면

void misbehave() {
  try {
    dynamic foo = true;
    print(foo++); // Runtime error
  } catch (e) {
    print('misbehave() partially handled ${e.runtimeType}.');
    //rethrow; // Allow callers to see the exception.
  }
}

void main() {
  try {
    misbehave();
  } catch (e) {
    print('main() finished handling ${e.runtimeType}.');
  }
}


misbehave()에서 catch가 처리되고 종료된다.


마지막으로 finally 처리

try {
  breedMoreLlamas();
} finally {
  // Always clean up, even if an exception is thrown.
  cleanLlamaStalls();
}

exception 발생 여부 관계없이 일부 코드를 실행시키려고 한다면 finally를 사용한다.

exception이 발생되면 발생 후에 실행되며, 발생되지 않으면 try문 코드를 실행하고 실행된다.


반응형
반응형

Dart 프로젝트는 VSCode( Visual Studio Code)에서 만들 수 있다.

(DartSDK설치하고 터미널에서 만들 필요 없이!)


사전에 바로 전 작성한 포스팅 대로 진행바란다.


2020/05/18 - [난장 Dev/Flutter - Dart] - Dart - 시작하기 - VSCode 설치


Dart - 시작하기 - VSCode 설치

먼저, Flutter를 시작하기 위해서 Dart라는 언어에 대해 공부가 필요하다. 나처럼 그냥 바로 Flutter를 시작할 수 있지만 얼마 후 나처럼 Dart를 시작할 것이다. 어렵지는 않지만 최소한 변수, 조건문, �

naan.co.kr


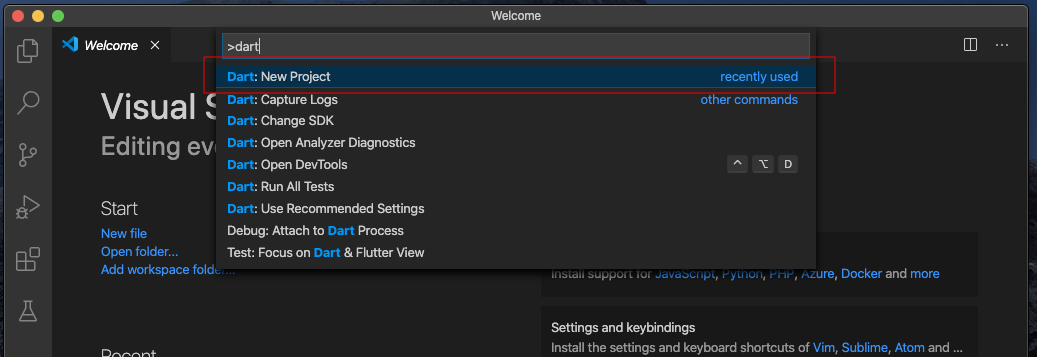
VSCode를 실행하고 나서 상단에 보이는 "View > Command Palette..." 을 클릭하거나 "Shift + Command + P" 키를 눌러 Command Palette를 실행시킨다.


아래의 화면이 뜨면, ">dart"를 입력하고 나오는 "Dart: New Project"를 클릭한다.


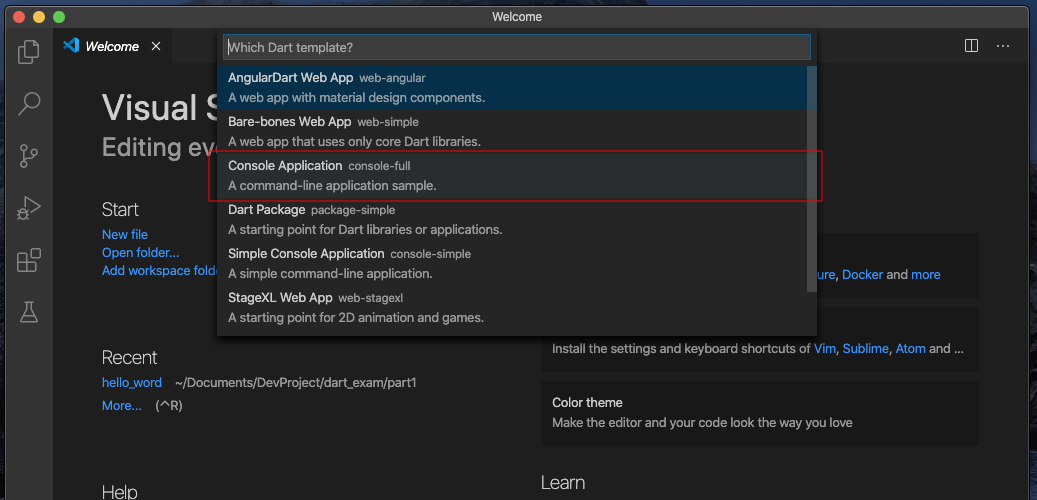
다음 단계로 Dart 템플릿을 설정해야 하는데 공부를 위한 것이니 "Console Application"을 클릭한다.


사용할 프로젝트 이름을 입력한다. 모두 소문자로 입력해야 한다. 

예) part1_helloworld


프로젝트를 저장할 위치를 지정한다.


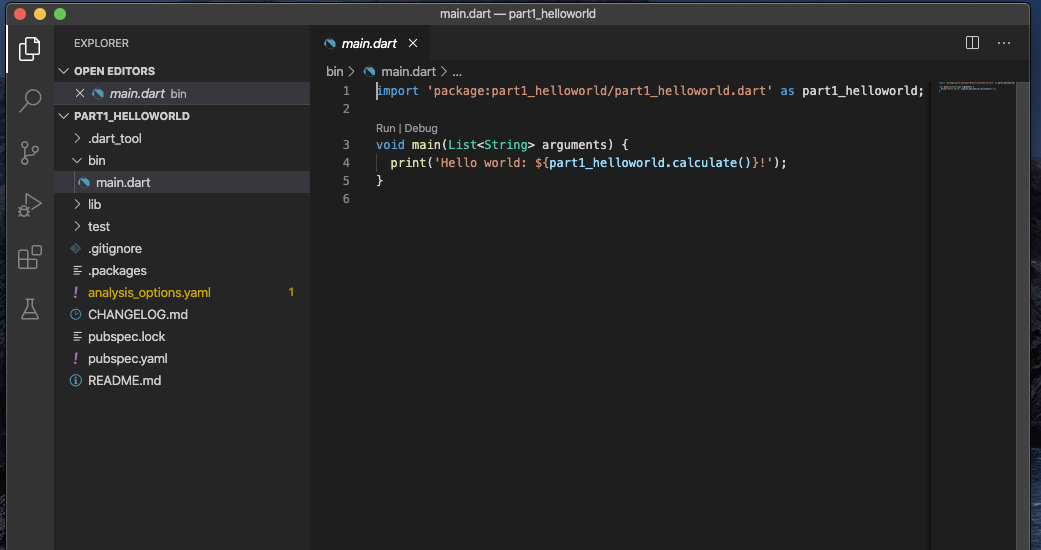
그러면 Dart 기본 프로젝트가 만들어 진다.


F5키를 누르면 아래 Console에서 결과 값을 확인 할 수 있다.


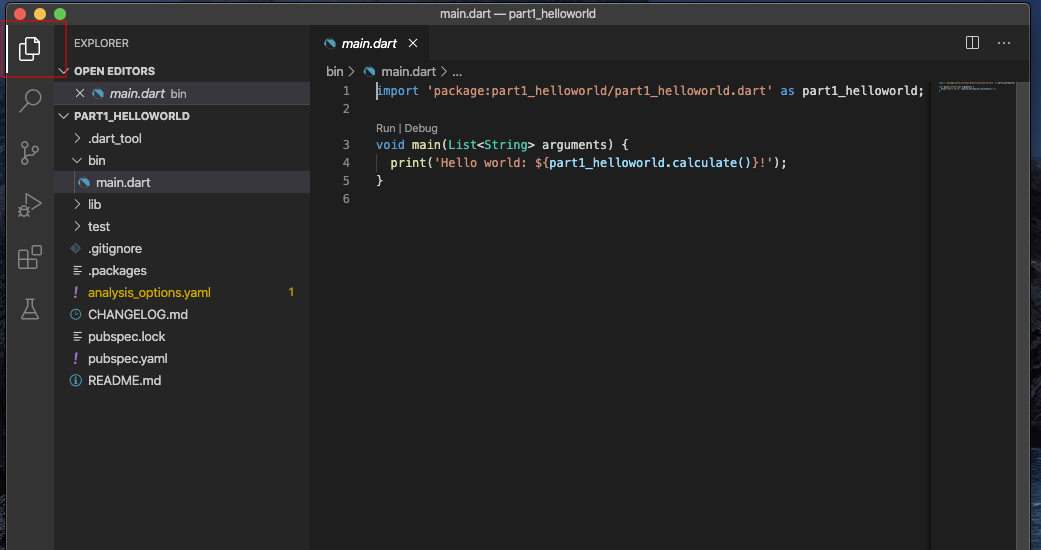
다시 코드로 가고 싶다면 왼쪽에 보이는 아이콘 중 제일 위에 있는 아이콘을 클릭하면 다시 입력된 코드를 확인할 수 있다.


Android Studio 에서는 기본 프로젝트 생성이 VSCode처럼 하지 않고 터미널에 들어가서 직업 생성하고 열어야 하는 것 같았다.


반응형

+ Recent posts